Post-Call Webhooks
Send call data from CallScaler to Zapier, Slack, your CRM, or any URL automatically after every call.
Overview
Post-call webhooks fire from CallScaler to your server after a call ends. They send a rich JSON payload with full call details, AI analysis, transcription, and attribution data — the recommended way to integrate with CRMs, automation tools, and custom systems.
Looking for the other direction — pulling payout reports into CallScaler from a buyer or external network like Ringba, MarketCall, or Trackdrive? See Payout Sync.
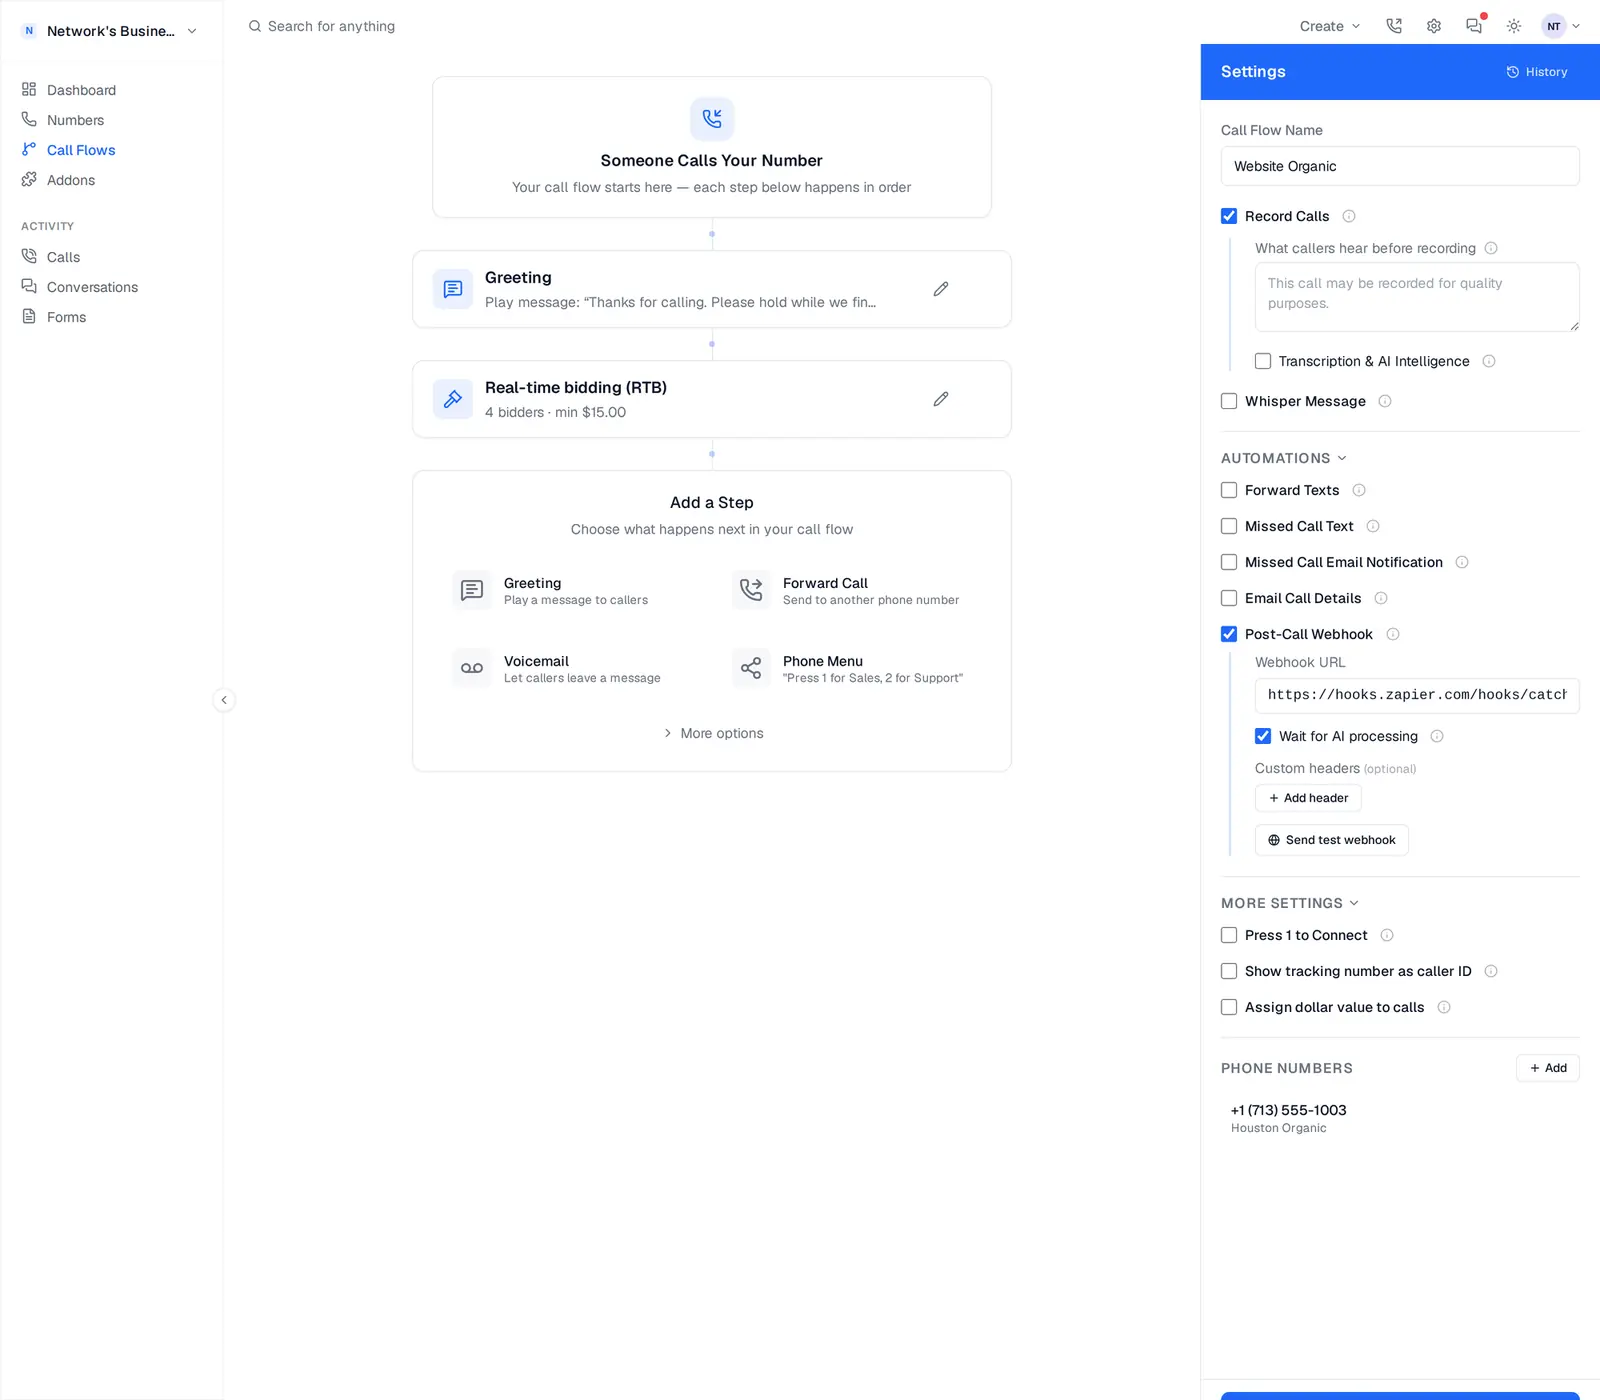
Setup
Post-call webhooks are configured per call flow. When enabled, CallScaler automatically sends an HTTP POST request to your URL after every call through that call flow.
1. Open Call Flows and select a call flow.
2. In the right-side settings panel, expand AUTOMATIONS and tick Post-Call Webhook.
3. Paste your destination URL into the Webhook URL field.
4. Tick Wait for AI processing if you need transcription/AI fields populated (otherwise the webhook fires immediately on hangup).
5. Optionally add Custom headers, then click Send test webhook to verify the endpoint receives the payload.
6. Save the call flow.
Firing Modes
Immediate (default) — The webhook fires as soon as the call ends. AI fields (ai_score, ai_category, transcription, etc.) will be null because analysis hasn't completed yet. Use this when you need instant notifications and don't need AI data.
Wait for AI — The webhook waits until transcription and AI analysis are complete before firing. This gives you the full payload with AI scores, transcription, summary, and qualification data. There's a 5-minute fallback — if AI processing hasn't completed by then, the webhook fires anyway with whatever data is available.
Use Wait for AI if your integration needs transcription text, AI scores, or qualification status. Use Immediate for instant Slack notifications or time-sensitive alerts.
Payload Reference
The post-call webhook sends a JSON payload with these fields:
- •
event— Event type:call.completed,call.missed,call.voicemail, orcall.failed - •
call_id— Unique call ID - •
business_id— Your business ID - •
call_flow_id— Call flow ID - •
call_flow_name— Call flow name - •
tracking_number— Your CallScaler tracking number - •
caller_number— The caller's phone number - •
destination_number— Forwarding destination (null if not forwarded) - •
direction—inboundoroutbound - •
status—completed,no-answer,voicemail,busy, orfailed - •
duration_seconds— Call duration - •
recording_url— Recording URL (null if not recorded) - •
recording_duration— Recording length in seconds - •
transcription— Full transcription text (null if not available yet) - •
summary— AI summary of the call - •
ai_score— Quality score 0–100 - •
ai_category—lead,existing_customer,spam,wrong_number, orvoicemail - •
qualified_ai— Whether AI marked this as a qualified lead - •
qualification_reason— Why the call was qualified or not - •
source— Traffic source - •
landing_page_url,referrer_url— Visitor journey - •
utm_source,utm_medium,utm_campaign,utm_term,utm_content— UTM parameters - •
gclid,fbclid,msclkid— Ad platform click IDs - •
value_cents— Assigned call value - •
cost_cents— Call cost - •
robo_score— Robocall likelihood score - •
ai_processed— Whether AI analysis has completed (true/false) - •
created_at— When the call occurred - •
webhook_sent_at— When the webhook was sent - •
delivery_id— Unique delivery ID for tracking - •
attempt— Which delivery attempt this is (1, 2, or 3)
Payload Example
A complete post-call webhook payload:
{
  "event": "call.completed",
  "call_id": "a1b2c3d4-e5f6-7890-abcd-ef1234567890",
  "business_id": "uuid",
  "call_flow_id": "uuid",
  "call_flow_name": "Google Ads",
  "tracking_number": "+15735551234",
  "caller_number": "+13055559876",
  "destination_number": "+13055554567",
  "direction": "inbound",
  "status": "completed",
  "duration_seconds": 145,
  "recording_url": "https://callscaler.com/api/v1/audio/abc123.mp3",
  "recording_duration": 138,
  "transcription": "Hi, I need a quote for a new AC unit...",
  "summary": "Homeowner requesting HVAC quote for new installation.",
  "ai_score": 85,
  "ai_category": "lead",
  "qualified_ai": true,
  "qualification_reason": "Strong buying intent — requesting pricing",
  "source": "google",
  "landing_page_url": "https://yoursite.com/hvac",
  "referrer_url": "https://google.com",
  "utm_source": "google",
  "utm_medium": "cpc",
  "utm_campaign": "hvac-tampa",
  "utm_term": "ac repair near me",
  "utm_content": null,
  "gclid": "abc123def456",
  "fbclid": null,
  "msclkid": null,
  "value_cents": 5000,
  "cost_cents": 15,
  "robo_score": 0,
  "ai_processed": true,
  "created_at": "2026-03-30T14:30:00Z",
  "webhook_sent_at": "2026-03-30T14:31:15Z",
  "delivery_id": "uuid",
  "attempt": 1
}
Retry Logic
If your endpoint returns an error (HTTP 4xx or 5xx) or doesn't respond within 10 seconds, CallScaler retries the delivery:
1. Attempt 1 — Immediate
2. Attempt 2 — After 30 seconds
3. Attempt 3 — After 2 minutes
After 3 failed attempts, the delivery is marked as failed. You can check delivery status in the Webhook Deliveries API or in the call flow settings in the dashboard.
Your endpoint should return a 200 status code to acknowledge receipt. The response body is ignored.
Testing Webhooks
Each call flow with a post-call webhook has a Test button. Click it to send a sample payload to your URL using data from a recent call. This lets you verify your endpoint is receiving and parsing the data correctly without making a real call.
Connect to Zapier
Zapier connects CallScaler to 6,000+ apps without code.
1. In Zapier, create a new Zap and choose Webhooks by Zapier as the trigger.
2. Select Catch Hook as the trigger event.
3. Zapier gives you a webhook URL (starts with https://hooks.zapier.com/...). Copy it.
4. In CallScaler, paste the URL into the call flow's Post-Call Webhook field.
5. Save the call flow and click the Test button to send Zapier a sample payload.
6. Back in Zapier, click Test trigger — it should pick up the call data.
7. Add an action: send an email, create a CRM contact, add a Google Sheets row, post to Slack — whatever you need.
Every call through that call flow automatically triggers your Zap.
Connect to Slack
Get a Slack notification for every call.
Option A — Slack Incoming Webhook (no Zapier needed):
1. In Slack, go to Your Apps → Create New App → From Scratch.
2. Go to Incoming Webhooks → Activate → Add New Webhook to Workspace → pick a channel.
3. Copy the webhook URL (starts with https://hooks.slack.com/...).
4. In CallScaler, use this as your post-call webhook URL. Slack accepts JSON payloads natively — it will post the raw call data to your channel.
Option B — Via Zapier (formatted messages):
Follow the Zapier steps above and choose Slack → Send Channel Message as the action. This gives you full control over message formatting, emoji, and which fields to display.
Connect to Make (Integromat)
1. In Make, create a new scenario and add a Webhooks → Custom webhook module.
2. Click Add to create a new webhook. Make gives you a URL — copy it.
3. In CallScaler, paste the URL into the call flow's Post-Call Webhook field.
4. Click the Test button so Make can learn the data structure.
5. Add more modules to your scenario (CRM updates, emails, sheets, etc.).
6. Turn the scenario on.
Connect to Google Sheets
For Google Sheets, CallScaler has a built-in Google Sheets addon that's simpler than a webhook. It automatically pushes call data to your sheet with no setup beyond connecting your Google account.
If you prefer using a webhook, you can route calls to a Google Apps Script:
1. In your Google Sheet, go to Extensions → Apps Script.
2. Create a doPost(e) function that parses the incoming data and appends a row.
3. Deploy as a web app (execute as you, anyone can access).
4. Copy the deployment URL and use it as your webhook URL in CallScaler.
We recommend the built-in addon over the manual webhook approach for Sheets.
Troubleshooting
Webhook not firing?
• Make sure it's toggled on in the call flow settings.
• Check the Webhook Deliveries API for error details.
• If using Wait for AI mode, the webhook won't fire until transcription completes (up to 5 minutes).
• Your endpoint must return a 200 status code within 10 seconds — otherwise it counts as a failed attempt.
Getting errors?
• Check that your URL is publicly accessible (not behind a firewall, VPN, or internal network).
• CallScaler always sends JSON with Content-Type: application/json — make sure your endpoint parses JSON.
• Custom headers misconfigured? Re-check them in the call flow editor.
On this page